


Diabetes Educators Calgary Charting Guidelines
Charting for New Patient Visits
Charting for New Patient Visits
The following details the most that might be covered in a first appointment. Patient-specific needs, wants, and characteristics may necessitate altering topics covered. In setting an agenda, remember to let the patient know that items may need to be referred or deferred, if time runs short. In any case, safety checklist items should always be covered.
The order in which topics are covered might vary. For example, when talking about hypoglycemia, food details or activity might come up.
If you are the person seeing the patient second, certain topics might have already been covered by your colleague. Review their notes, and you might be able to simply confirm the information.
You are able to Pre-Chart certain data before the patient arrives. If the patient then arrives, you still need to check the patient in, then "Start the Visit". Pre-charted data will be retained for 60 days. If the patient is not coming until beyond that 60 day period, notes may be saved to "Pasteboard." See this Tip Sheet for details.
Guidelines for charting class attendance or joint appointments can be found here.
Demonstration Videos are linked to at the bottom of the page.
Review the Chart
Your schedule lists your patients for the day and includes the visit type, schedule notes, latest A1c and personal yellow sticky notes for each patient.
- Single-click for a quick view of details; Double-click to open the patient chart.
- The first time you open a patient chart, we encourage you to customize your tabs to our standard layout. Afterwards, the layout will stay the same each time you open patient charts.
- **VERY IMPORTANT** If this is a virtual appointment, Check In the patient. Go to the Appts tab and select "Check In" at the bottom. Verify the PCP (primary care provider), but don't worry about other warnings that may pop up (e.g. travel screening).
- Clerical staff will check in in-person appointments.
- An unscheduled telephone call does not require check in.
- Review the information on the Storyboard (the left-hand panel of an open patient chart). If necessary, click on the patient name to open Demographics, and go to Clinical information to indicate the need for an interpreter. Update details that require updating now, and throughout the appointment. Do not add yourself to the Patient Care Team (doing so means you can be messaged by the patient, even after they are discharged).
- Use the 'Chart Review' tab to look at the following historical information: Encounters, Notes, Referrals, Labs, Media.
- If there are many previous encounters or notes listed in Connect Care, consider clicking on Filters, and filter by Department Specialty = Endocrinology to select the most relevant encounters.
Problem List, Visit Diagnoses, Reason for Visit and Episode of Care
-
Review Problem List (Storyboard > Problem List)
-
Update if necessary. You might need to update again part way through the appointment. See this page for guidelines.
-
To the best of your knowledge, pick the simplest and most accurate problem. See this page for more details.
-
-
Choose you Visit Diagnoses
-
Select 'Add Dx' at the bottom of the patient chart. Choose from the Problem List.
-
-
Document Reason for Visit
-
Nurses find this under the Rooming tab and Dietitians find this under the Nutrition Care tab.
-
Include patient agenda items.
-
-
Review Episode of Care
-
Nurses will find this under the OB Tools tab > Episodes, and dietitians will find it under the Nutrition Care tab > Episodes.
-
For non-pregnant, use Name = DCC, Type = Diabetes Chronic Disease Management
-
For DIP, if someone else has started a pregnancy episode, do not edit it.
-
If you are the one starting the pregnancy episode, use Name = DIP, Type = Pregnancy. It's very important for there to be a pregnancy episode for pregnant women, because there are some tools that are not available otherwise.
-
Gather Data
Review and document, as indicated:
- Medications
- Nurses find this under the Rooming tab and Dietitians find this under the Nutrition Care tab.
- Vitamins, minerals and supplements are included here.
- Add items as needed. If you are the one recommending, e.g. a vitamin, make a note in the "Instructions" free text box.
- For insulin, use the appropriate the specific scenario found here.
- Safety Checklist
- Under the Diabetes Management tab, select 'New Reading', then expand the checklist. Check off topics that you have asked about.
- If nothing concerning was identified, there's no need to go further.
- The text box item termed "Comments for List" is used to document concerns that were identified.
- Glucose readings
- Option 1: Under the Diabetes Management tab, scroll to "Glucose Readings" then click 'New Reading'. Document a summary of glucose readings as reported by the patient. You might choose to enter textual comments as well.
- When appropriate, attach glucose records, following these guidelines.
- Use the data fields to enter CGM parameters, if available, as a combination of text and values. For example, you might enter "Past 2 weeks, Time in Range (3.9 to 10.0 mmol/L) = 72%". This allows a nice historical view of these parameters.
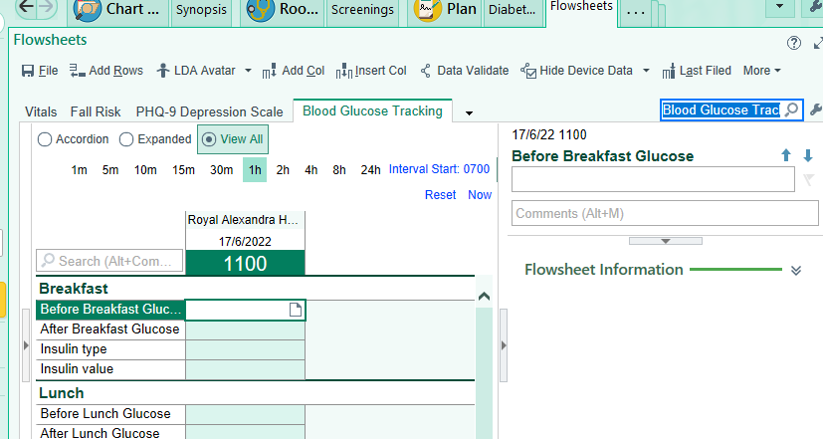
- Option 2: There are circumstances when you might choose to enter day-by-day readings. To do that, under the Diabetes Management tab > Glucose section, click 'Flowsheets'.
- The active column defaults to the current date.
- To enter data for previous dates, click on 'Insert Col'. Select earlier dates, one column at a time.
- If you have a problem finding this, you can use the storyboard search field to type in flow (don't hit enter) > jump to flowsheets> then in the search field near top right of flowsheets, type Blood Glucose Tracking. See image here.
- If you do a glucose reading with the Inform II meter, you must input the CSN (Contact Serial Number), in one of 2 ways
- Ask clerical to print a patient label (IP 1 X 3") from within the encounter. Scan the barcode on the label.
- With a patient encounter open, hover over the MRN on the Storyboard to see the CSN. The number is 12 digits long, and is entered in the format "AC000012345678"
- Option 1: Under the Diabetes Management tab, scroll to "Glucose Readings" then click 'New Reading'. Document a summary of glucose readings as reported by the patient. You might choose to enter textual comments as well.
- Lifestyle
- Dietitians review dietary history, and document the Nutrition Diagnosis under the Nutrition Care tab.
- Nurses briefly review safety considerations regarding dietary intake, and document any concerns under the Safety Checklist (as described above)
DIP Specific Data
- For Obstetric history, go to the History tab > Obstetrics. If you know the details about the outcomes of previous pregnancies, do not enter GPA directly. Enter the details, and GPA will calculate automatically.
- For EDD and gestational age, go to the OB Tools tab > Dating. Use ultrasound data, if available. As a quicker way to enter the data, you may choose Basis = "Other basis", type "Ultrasound" in the comment box, and enter the EDD directly.
- For pregravid weight and tracking of weight gain during pregnancy, go to 'Prenatal Vitals and Notes' under OB Tools.
Provide Education and Agree Upon a Plan
- If applicable, document the agreed upon insulin doses in the Insulin Instructions section under the Diabetes Management tab.
- Add your note using the appropriate Smart Phrase.
- Document Actions and Plans in the section near the bottom.
Schedule Follow Up (if needed)
For detailed instructions on scheduling, see this Quick Start Guide. Consider discharging the patient, if appropriate.
To schedule a follow up appointment:
- Click on "Appts" tab > Make Appt. Enter any relevant Appt notes
- Select Visit Type
- Select Provider or Department, and enter the search name in the text box.
- Enter date to "Start search on", e.g. w+2 means 2 weeks from today
- If desired, you may check off the box "Auto search" then click Search. The first available appointment will be displayed.
- Schedule the appointment. Note: if you do not pick the first available, you will need to
- Enter a reason, e.g. 'Postponed by Patient or Provider'
- Enter an "End date", which is the earliest date the appointment could have been scheduled (used for statistical purposes)
- Accept the appointment. Clear any warnings.
Complete Wrap Up and Sign Visit
- **VERY IMPORTANT** If you see a tab "Attendance/Visit", you need to document the activity. This is akin to doing OACCS or Infomed.
- Choose "Visit with Allied Health or Specialty Encounter"
- Click on the interlocked rings, and check off the Visit Diagnoses the visit is linked with.
- "Accept charges".
- Note that telephone appointments or appointments scheduled directly with you do not require this step, and the tab will not be there.
- Double-check your note. Refresh the note, if you've added any further data after having added it. Accept your note.
Send your note to appropriate MDs:
- One time Set Up:
- Go to the Communications section in a chart, and click on the wrench next to “New Communication”
- Under “Additional Leter Templates” type “shared external” then <Enter>:
- Select “AHS Blank; Shared Externally + Netcare”.
- Give it a Display Name (Only you will see this name. You might consider using “Progress Note”)
- Click “Accept”.
- Sending your note:
- Finish your chart note as usual.
- Go to Communications, and click on “New Communication”.
- Select who you are sending the note to, as usual. Leave the delivery method unchanged from the default.
- For the type of note, click on the button you just created:
- In the free text area, type “.pnotes” and double-click on it, to populate your note.
- Send as usual.
Sign your visit.
Demonstration Videos
The following video demonstrations are meant as examples only, showing each type of appointment from start to finish.
- New non-DIP Diabetes Patient - Nurse [See video on J:drive \Connect Care\Demonstration Video Links\DCC - CC - Demonstration Videos.docx]
- New non-DIP patient visit with the nurse
- New non-DIP patient visit with the dietitian
- New DIP patient visit with the dietitian